How do you organize #allthethings in your classroom? From task cards, to games, to extra supplies – organization can get to be a bit chaotic. Unless of course, you have a master plan. Over the last few years, I have tried many different strategies to get my classroom organized. The only system that has worked is this five step plan. It cleans out the junk (let’s face it… teachers by nature are hoarders) and controls the chaos.
This post contains some affiliate links to make your life easier! Any purchases made through one of these links earns us a small commission. at no extra cost to you. The commission helps to support the blog so we can continue to share content and freebies with you. All views and opinions are purely my own.
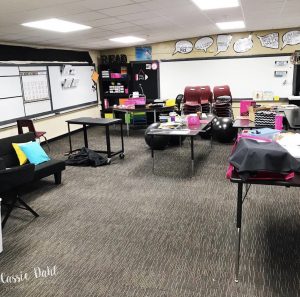
Step One: Empty
This is the most overwhelming step of the whole process. Open every single drawer, cupboard, container, etc. Lay everything out on your student desks/tables or on the floor. This will give you a true picture of everything you have. Don’t leave anything tucked away. Bring out all the goods. You can put like items together to make the next steps easier, but its not required. This can get messy!!
Step Two: Sort
This will be the most time consuming step of the whole process. Create three separate areas of the room to sort your materials (you can combine this with step 1 if you want to sort while you empty). The three areas will be: keep, share, and toss. Go through all of your materials and place them in one of the three areas.
In the “keep” pile, put everything that you know you will use in the next two years. If you have no intention of using the item anytime soon, don’t keep it.
In the “share” pile, put everything that you might be able to share with other teachers in your building. These are the items that are in good condition still, but you don’t have a purpose for them anymore.
In the “toss” pile, put everything that just isn’t worth keeping anymore and that can’t be used by anyone else.
Step Three: Distribute
With the remaining items in your “keep” pile, distribute them around the classroom. Decide where you want to put the materials. For example: if you have indoor recess games, think about where the best place would be for students to easily access them. Don’t worry about putting everything in the cupboards, closets or drawers yet. Just place the items in the space you want to store the materials during this step. When all the materials are distributed, take a look at each space and make sure what you have put there will fit. If not, you will need to make a few changes.
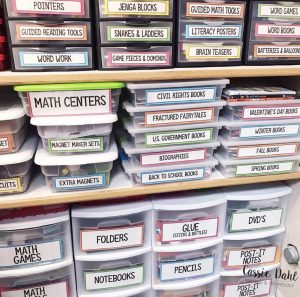
Step Four: Contain
Now that the materials are there, you will need to decide what containers to utilize for each of the materials. Anything will work! You can purchase containers or you can use some recycled items (ice cream buckets, coffee cans, etc.). I try to put everything in some kind of container. It keeps everything more organized and allows you to complete the next step.
Some of my favorite containers are from Amazon (shop HERE) and Target.
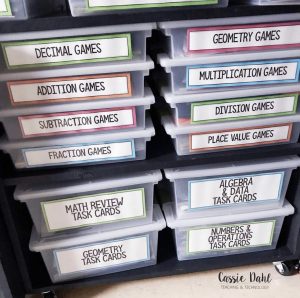
Step Five: Label
The final step is to #labelallthethings. This is my favorite step! You can use anything to label your materials. Printed and laminated labels work great. You can also use masking tape and a sharpie. The whole purpose of this step is for you to easily see exactly what is in each container and not have to dig for materials. After labeling, put everything away and soak in that sweet smell of success.
It’s as easy as that! Keep in mind, that even though the process is easy- it is time consuming. These steps can be repeated multiple times if you would rather tackle one space in your classroom at a time. That may result in you moving materials a few extra times, but it might be more manageable for you. Let me know if you have any questions!
Are you wanting some more organization strategies? Click HERE to read about how I color code my classroom and HERE to read about how I organize student materials.